Archive for March, 2008

Succotash with Good Mother Stallard Beans (and Without Bear)

Friday, March 28th, 2008

succotash.jpg

 (Vegetarian, Vegan, Gluten-free)

There are as many recipes for succotash out there as there are imitations of Sylvester the Cat lisping over the syllables. Like cornbread, every region within the US seems to have its own version of succotash.

That’s what I like about it. This is the kind of dish that speaks to me on the same level that heirloom seeds do. Succotash is a dense historical novel on a plate, with a plot that delivers tragedy, triumph, courage and transition, and turns on survival and celebration. This dish is itself an heirloom, a native to this continent that evolved over time, with the people, depending on what they had and what they could cultivate. It was as dependent upon them as they were on it.

It’s a place-based food, succotash is. Like a true story, every person who tells (cooks) it will tell (cook) a slightly different version.

When we think about our own historical roots, U.S. residents tend to look to Europe and Africa and Asia, to places with much broader stories than our history in this place. The part of American history that belongs to us is very young.

But America does have a rich history, much older than the 232 years that we generally think of. Some of this country’s most powerful stories can be told through the food that has been handed down.

True succotash contains lima beans and corn. The rest seems to be up for grabs.

nutmeg.jpg

Like most stories, this one seems to embrace paradox. For instance, succotash is thought to be one of the first recipes the Algonquin Indians taught the settlers at Plymouth Rock. If this is so, then the early versions couldn’t have contained the requisite lima beans, since those are a long-season, warm weather crop. Succotash was also made by the Narragansett Indians, who called it misckquitash, which means “boiled corn”. It is notable that the two primary ingredients are two of the Three Sisters – beans, corn, squash — the main agricultural crops of many Native American tribes.

I found versions containing green beans, bell peppers, squash, onions and peas. I’ve even seen it with tomatoes and broccoli. Since those aren’t native crops, I tend to think these aren’t true succotash recipes.

The recipe

You’ll be relieved to know that I omitted bear fat. Yes, it’s a true native American food when it’s held together with the lard of Ursus Americanas.

I tried to keep my version as true and simple as possible, with a couple of deviations. There’s my addition of nutmeg (not, in case you were wondering a native spice!). In place of bear (or, as is commonly used now, butter or cream) I used olive oil. This rendition is simple and straightforward, which is what the bean calls for.

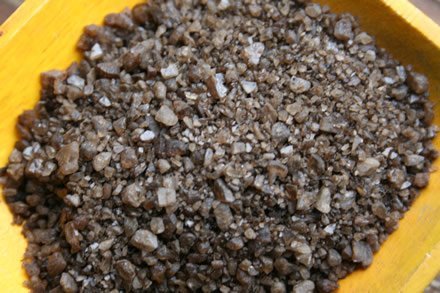
Good Mother Stallard is the star of this recipe. I purchased these beans from Seed Saver’s Exchange, but they’re also available from Rancho Gordo, who I’ll be talking about in next week’s post. Like the Hutterite soup bean, Good Mother Stallards are going to the top of my list.

stallard2.jpg

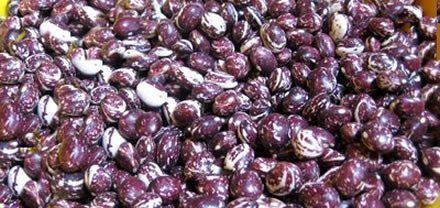
When cooked, they plump up till they are almost perfectly round. Dense, meaty, gorgeous and delicious, this bean deserves a simple dressing so that its personality can shine through.

Though I didn’t try it myself, I’ve been hearing that they yield an almost perfect pot liquor (the liquid left over after boiling something). Even after cooked, it holds onto its creamy color and burgundy markings (though the burgundy bleeds into the cream a bit). It’s nutty, earthy and extremely rich.

The seed was acquired by Seed Saver’s Exchange over a decade ago, from Glenn Drowns, a prominent horticulturalist and plant breeder. It’s a family heirloom that goes back many generations.
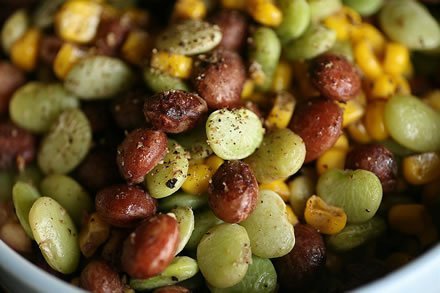
Succotash
¼ cup olive oil (traditionally bear fat, but I was out of that)
1 1/2 cups cooked Good Mother Stallard beans
1 cup cooked fresh or frozen shelled lima beans
3 cups corn
Black pepper, freshly ground
Salt
Nutmeg, ground fresh

Place Good Mother Stallard beans, lima beans and corn in a large, heavy skillet. Add olive oil and toss well to cover. Heat mixture on medium high heat for about 8 minutes, until hot all the way through. Add salt, pepper and nutmeg, adjusting to your tastes (I prefer a heaveier dose of nutmeg and pepper and less salt). Serve immediately.

Avocado Spread with Smoked Salt and Elvie Beans

Saturday, March 22nd, 2008

crostini2.jpg

(Vegetarian, vegan, gluten-free option)

A funny thing happened on the way to the French loaf.

I’ll admit that sometimes, I find myself so enamored of a dish that I’m tempted to toss in a handful of beans, just so that it qualifies as a bean blog post. Problem is, superfluous beans often give themselves away. It can work out, as with the Baked Tomatoes with Crusty Bread. Then again, it can go terribly wrong, as with the white bean and pumpkin risotto. Yeah, I know, what was I thinking? It doesn’t even sound good. Needless to say, that recipe never made it here.

With this week’s recipe though, the beans absolutely transformed what otherwise might have been another version of guacamole. But first things first.

Recently I discovered smoked salt. It must be old news in the culinary world, but it’s new to me. I was wandering the sample circuit at Whole Foods and absentmindedly accepted a granule of the Na. I was blown away.

smoked-salt.jpg

The flavor is intense – biting, meaty, and lingering – and the aroma conjures images of great forest fires. As with most large-granule colored salts, it’s often meant as a finishing salt, adding a heftiness to a dish.

Inspired by spring and the not-long-passed St. Patty’s Day, I was aiming for green. Put in a mood by rapidly and perpetually fluctuating weather extremes, I was also going for polemic flavors that would smooth and balance one another. I hit upon an avocado spread.

The Recipe

My thinking was that the smoky salt would sharpen the creaminess of the avocado. A spike of lemon served a dual function, waking up the spread and also preventing it from browning. I envisioned it atop crostini, garnished with thin slices of radish and cucumber. And so it turned out, a delightfully fresh, spring-green hor deourve full of punch. I was chuffed.

But oh. The beans.

crostini11.jpg

It was with reluctance that I acknowledged that I had to throw some into the food processor if this recipe would qualify for the bean blog. Admittedly, I didn’t use a lot of beans, proportionally speaking. Since there are few, and since they get blended to an unrecognizable finish, this is one case where I’d probably recommend against using an heirloom. My rules are my rules though, so I went with an old heirloom called Elvie.

Grown out from a seed obtained from Baker Creek Heirloom Seeds, these beans are creamy white-beige in color. According to Jere Gettle of Baker Creek, the seed was originally given to him by a customer, who claimed that it had been (and still is) grown in his family for generations. Gettle describes them as having an “old time flavor”. I don’t know exactly what that means when it comes to beans, but they are creamy, rich, moist and not too meaty.

Whatever their characteristics, they worked a magic on the avocado spread. Where it had a thin, runny consistency B.E(lvie)., the legumes gave it a silken, smooth, full-bodied and whipped texture. Where it had been like salsa (in texture only), it was now like mayonnaise, decadent and soft.

I used a bit of smoked salt in the puree, and also as a finisher. But know this: smoked salt speaks loudly and carries a big stick. A pinch will get you where you need to go.

Another thought: lovely as a dip or spread, the puree would make a lovely addition to scrambled eggs or huevos rancheros. But my guess is that it won’t last long enough to find a second use.

Avocado Spread with Smoked Salt and Elvie Beans

3 ripe avocados
One large lemon, cut in half
1 teaspoon smoked salt
½ cup cooked Elvie beans
Radish and cucumber, sliced very thinly for garnish
½ loaf of rustic French bread
Preheat the oven to 350. Slice the French bread into rounds, and then halve those pieces. Place on baking sheet and toast until golden, about 10 minutes, turning once during baking time. If you wish, you can brush olive oil onto the bread slices before baking.

Peel avocados and place them in food processor, along with the juice of half the lemon, the smoked salt and the Elvies. Process until the ingredients have formed a rich spread with a silken texture. You may want to add a bit more lemon juice and/or salt – modify it to your taste.

Spread avocado puree onto the crostini and line them up on a tray. Taking the other half of the lemon, spritz the crostinis with the remaining lemon juice.

Using a peeler, shave very thin slices of avocado and cucumber. Alternating between radish and cucumber, place one or two slices on top each hor deourve, then finish with a granule or two of smoked salt. Enjoy!

Sour Cream Cupcakes with…. Jelly Beans!

Wednesday, March 19th, 2008

jellybeans4.jpg

Did you think I was going to miss the chance to write about jelly beans? There’s just something about them – maybe it’s nostalgia, maybe it’s all those unexpectedly bright colors. Maybe it’s that from brand to brand, they’re different, and there’s no telling what a color will taste like until you’ve had it. I don’t know, but whatever that magic is, jelly beans are my favorite.

Is anyone else out there a black jelly bean loyalist? You either love ‘em or hate ‘em. I brake for black jelly beans. I’ll love them till the end. And that may be sooner rather than later, since my sister and I still fight like pig-tailed, red-kneed seven year olds over the black ones.

A bit about the noble jelly bean. The gummy, chewy insides originated hundreds of years ago, as Turkish Delight, a traditional candy first made in Istanbul. The shell is similar to the one developed for Jordan almonds, in the 17th century. At some point in the early 20th century, someone got their Turkish Delight in your Jordan almonds, and the jelly bean as we know it was hatched.

jellybeans2.jpg

I thought long and hard about a recipe that could incorporate The Bean. Not much came to mind. Jelly bean cookies? Nuh uh. Jelly bean Rice Krispies didn’t inspire me. Jelly bean pizza? Jelly beans and greens had a nice ring. But no, it seems that jelly beans are best eaten straight out of the bag.

Still, you won’t get through the Easter season without seeing jelly beans perched atop a mountain of cupcake icing. And so it should be. You can always pick them off and save them for later.

Now, before I let you see my cupcake photo, just, well, I’ll never win an award for pastry decoration. I do realize this.

I’m sharing my favorite cupcake recipe, which came from Cook’s Illustrated. For those of you unfamiliar, Cook’s Illustrated is a food think tank. They rigorously test everything – products, food brands, recipes, anything that has a job in the kitchen.

cupcakes2.jpg

With this cupcake recipe, they made multiple batches of multiple versions of this pastry. They tested the effect of different fats (butter was the favorite), then dairy products for moisture (taste testers almost unanimously chose sour cream over milk, cream, or yogurt). They tried sifting flour and not sifting it, they tried bread flour, cake flour, bleached flour, unbleached. They mixed the wet ingredients before adding them to the dry, then they tried dumping them all in at the same time, then one at a time. I think they even tested whether talking to the cupcakes makes them rise faster (it doesn’t). Pick up the magazine sometime and you’ll see what I mean.

Safe to say then, that I pretty well know that anything I take from CI is going to come out well. Since I’m vegan for the time being, I can’t tell you for sure how this particular batch of cupcakes worked out, but Simon is my test kitchen. He seems to like them.

The icing is a simple concoction. It’s also one of the least likely to cause heart attack that I’ve come across. These cupcakes are rich and require a lighter topping, but if you prefer, there are lots of recipes out there for butter-based icing.

The Recipe

Yellow Cupcakes with Vanilla Icing

Cupcakes
1 ½ cups unbleached all-purpose flour, unsifted
1 cup granulated sugar
1 ½ teaspoons baking powder
½ teaspoon salt
8 tablespoons (1 stick) butter, softened
½ cup sour cream
1 large egg, plus 2 large egg yolks, at room temperature
1 ½ teaspoons vanilla extract

Icing
4 cups (or more) sifted powdered sugar (sifted, then measured)
3 tablespoons (or more) whole milk
1/2 teaspoon vanilla extract

For the cupcakes: Adjust an oven rack to the middle position and preheat oven to 350 degrees. Line muffin tins with paper or foil liners.

In large bowl, whisk together the flour, sugar, baking powder and salt. Without pre-mixing first, add the butter, sour cream, eggs and vanilla to the dry ingredients. With hand mixer, beat on medium speed until mixture is smooth and satiny, abot 30 seconds. Scrape down sides of the bowl with spatula and stir by hand until smooth and no flour pickets remain.

Divide batter evenly between 12 muffin tins (though I only got 9 muffins with this mix), then bake until cupcake tops are pale gold and a tooth pick inserted into the center comes out clean, 20-25 minutes. It’s better to underbake than overbake — they’ll firm up when they cool. Let them come to room temperature before frosting.

For the icing: Combine 4 cups powdered sugar, 3 tablespoons milk, and vanilla in medium bowl. Stir until icing is well blended, smooth, and spreadable, adding more milk by teaspoonfuls if too thick or more sugar by tablespoonfuls if too thin.

Cupcake recipe taken from The New Best Recipe, All-New Edition, from the editors of Cook’s Illstrated. (2004)

Baked Tomatoes with Crusty Bread and Frijol Colorado

Saturday, March 15th, 2008

bakedtomato.jpg

(Vegetarian, vegan option)

I have two confessions to make about this recipe upfront: it’s stolen, and the beans are gratuitous. Oh, and it tastes like Christmas.

I lifted this recipe, almost wholesale, from the January 2008 issue of Gourmet Magazine. Except I threw in some beans so that I could use it on the blog.

I’ve been aching for tomatoes, garden fresh, full-bodied, truly ripe. Those can’t be found around here this time of year, but good quality canned tomatoes come pretty close in terms of flavor. This casserole offered me that, plus the chance to give the oven one last hurrah before it hibernates for the spring (okay, probably not, but as winter is winding down I find I’m baking less and less). I mixed fresh cherry tomatoes in with the canned to layer the flavor — I’m all about using both the fresh and the dried or, in this case, canned, versions of foods — but it’s certainly not necessary.

tomatoes.jpg

Though the beans were an apparently superfluous addition, they actually rounded out this dish and gave it a meaty texture. Frijol Colorado, a common bean (Phaseolus vulgaris) obtained as seed from Native Seeds/SEARCH and actually grown in my own garden, was the bean du jour. Frijol is Spanish for phaseolus, which is Latin for bean. I had only a few of the beans remaining in a glass jar in my pantry, just enough to cook up and toss into this casserole.

I was surprised these guys produced in my Midwestern 6a hardiness zone climate. I haven’t had much success with desert-native beans, but they did just fine, though they were slow to mature. When cracked open the dried pods reveal a large, slightly flattened dark red kidney from the central and southern Sierra Tarahumara region in Chihuahua.

We interrupt the regularly scheduled program: Before we get to the recipe, let me put a request out there to my local (St. Louis) readers who garden. I need beans! That is, somewhere around the end of summer I’m going to be running out of heirlooms that I can buy commercially. If any of you can spare a spot in your own gardens for one variety – and are willing to donate them back to me when they’re ready for harvest — I’ll promise to use them to make up something tasty for you. If you can help with the bean project, contact me!

The Recipe
My brother Tim, who takes most of my food photos, says this dish tastes like Christmas. That would be the cloves and allspice, which add a subtle exoticism to what would otherwise be a casserole. These spices, combined with the thyme, give the dish an unexpected flavor profile that’s hard to pin down.

In addition to the beans, I added more spices than Gourmet called for, and less onions and butter. I also threw in a splash of red wine. It doesn’t leave a direct flavor, but as the alcohol cooks out it draws full flavor from the ingredients. Okay, so by this point I guess I didn’t really steal the recipe. Here’s a link to Gourmet’s version, if you want to compare.

And here’s my rendition:

Baked Tomatoes with Crusty Bread and Frijol Colorado

3 28-ounce cans of Italian diced tomatoes in juice
½ cup fresh cherry tomatoes, diced (optional)
1/3 cup red wine (don’t use something you wouldn’t drink)
1/2 stick unsalted butter (because I’m vegan right now I used margarine), divided
1 ½ small onions, chopped
4 garlic cloves, finely chopped
3/4 teaspoon ground allspice
3/4 teaspoon ground cloves
1 teaspoon dried thyme
1 tablespoon packed light brown sugar
1 cup cooked Frijol Colorado (Colorado beans)
8 (1/4-inch-thick) slices good-quality whole-wheat bread

Preheat oven to 425°F with rack in middle. Butter a 3-quart baking dish (about 13 by 9 by 2 inches).

Drain tomatoes, reserving 1 cup juice, then chop.

Heat 2 tablespoons butter in a 5- to 6-quart heavy pot over medium-high heat until foam subsides, then cook onions with 1/2 teaspoon salt, stirring occasionally, until golden-brown, about 10 minutes. Add garlic, allspice, and cloves and cook, stirring, 1 minute.

Stir in canned and fresh (if using) tomatoes with reserved juice, red wine, thyme, brown sugar, and 1/2 teaspoon pepper and briskly simmer, uncovered, stirring occasionally, until thickened, about 20 minutes (it thickened in about 12 minutes for me).

Meanwhile, melt remaining 1/2 stick butter and brush onto both sides of bread. Halve each slice.

Transfer tomato mixture to baking dish. Sprinkle beans across the top of the mixture and top with bread slices. Bake until bubbling and bread is crisp and golden-brown, about 20 minutes.