Skillet Tacos with Tomatillo Salsa and Hopi Purple Beans

February 8th, 2008

skillet_taco.jpg

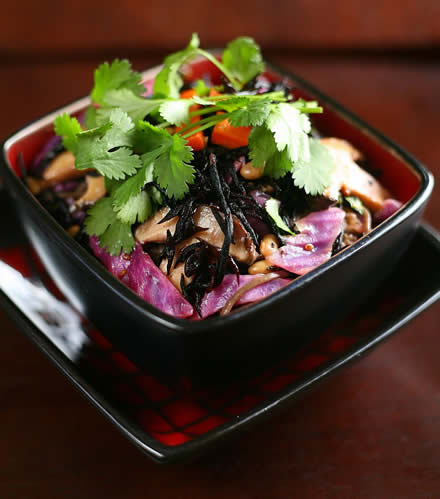
(Vegetarian, Vegan option, Gluten-free)

I’ve been wondering if you can brown beans in a skillet. I mean, given enough mashing and oil, I know you can. Take falafel or black bean burgers, for instance. But it’s a real shame to puree pretty little heirlooms, and I hoped that beans could maintain their individuality while getting a tan. Turns out, they can.

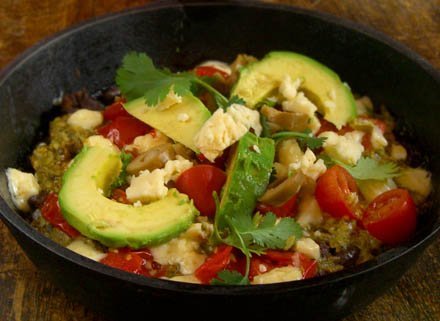
I got this idea in my head to make a skillet taco. I wanted golden, almost crunchy beans, topped with a nice tomatillo salsa, salty green olives, and a soft Mexican cheese that would melt on contact. I had no clue as to whether any of it would work, individually or as a dish. But after a few bites, the unanimous verdict was “yum!”

A purist would tell me it can’t be a taco without a shell. Nevertheless, that’s how I served it, straight out of the skillet onto a plate. It would no doubt fill a shell nicely though, so feel free. This dish actually reminds me more of an Indian taco rather than a Mexican one, so Indian Fry bread might be nice. I’m a terrible fryer – it makes the house stink, things come out soggy, and it’s bad for me to boot, so generally I just don’t even try. When I make Indian bread I end up baking it instead, and it works fine. If you don’t have a recipe (perhaps I’ll post one later) you could use oven-warmed pita bread.

The beans I used for this dish make me giddy. Here’s a long name: Hopi Purple String/ Rio Zape. Obtained from Native Seeds/SEARCH, this bean was recovered from the ruins of the Anasazi cliff-dwelling people in the American southwest desert. I also just learned that this one has made the Slow Foods Ark of Taste (like the Hutterite bean), and I concur with their decision. A deep reddish purple color, the beans have burgundy-black markings and semi-retain them after they’re cooked. The beans contain a hint of chocolate and smoke — which would make them perfect for chili — and a creamy texture.

The tomatillo salsa is the real highlight of this skillet taco. I know, I know, extra steps, but I promise you, it’s so totally worth it. This salsa knocked me out with its bright, vibrant, citrus-y flavor, and it really pulled together the flavors in the skillet. Double the recipe (but you’ll need two skillets to cook it down) and save some for later – it will make any Mexican or Southwest dish pop.

tomatillos.jpg

The recipe:

Skillet Tacos

2-3 tablespoons olive oil
4 cups cooked Hopi Purple String/Rio Zape beans
2 tablespoons chili powder
1 1/2 tablespoons cumin
1 teaspoon oregano
3 teaspoons smoked paprika
1 teaspoon sweet paprika
1 teaspoon chipotle pepper
1 teaspoon salt – or to taste1 teaspoon fresh ground black pepper
½ teaspoon cinnamon
¼ teaspoon allspice
Enough tomatillo salsa to cover the beans (recipe follows)
1 clove garlic, minced
1 red bell pepper, or a poblano for a mild spiciness, chopped
1 cup cherry tomatoes, cut in half
1/3 cup green olives, sliced into rings
1 cup Chihuahua cheese, crumbled or cut into very small pieces
½ cup cilantro
1 lime
1 avocado

Heat 1 tablespoon of olive oil in a skillet, and sauté garlic and peppers until translucent. Add tomatoes and cook until they are just soft. Remove from skillet and stir in ¼ cup of the chopped cilantro.

In a bowl, stir Hopi Purple beans with one tablespoon of the olive oil, until they are well coated. If you need more oil, add it gradually – you don’t want to saturate the beans. In the skillet, add enough olive oil to coat the bottom of pan and turn heat to medium. When oil is hot, add beans to skillet. Stir in the chili powder, cumin, sweet and smoked paprika, oregano, chipotle, salt, pepper, cinnamon and allspice. Stir beans well to combine spices and coat beans, and let cook 4 minutes, stirring now and then. As best as you can, flip the beans and then let cook without stirring for another four minutes, until they begin to brown on the bottom.

Turn heat to low and spread tomatillo salsa over the beans. Add sautéed vegetables, then garnish with olives and cheese. Place a cover on top of skillet and let warm through until the cheese gets soft. Remove from heat, garnish with cilantro and avocado, and then squeeze lime juice over the finished taco. Eat it as is, or scoop some into taco shells or onto flat bread. Enjoy!
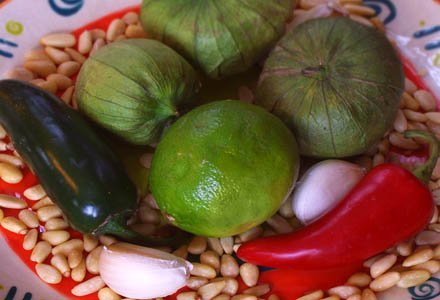

Tomatillo Salsa

1 cup pine nuts6 large garlic cloves, peeled and halved
10 tomatillos, husked, rinsed, and halved
1 jalapeno, seeded and halved
1/4 bunch cilantro, stemmed
1/4 bunch parsley, stemmed2 teaspoons sea salt
1 1/2 cups vegetable broth
2 tablespoons olive oil

Line a heavy skillet (preferably cast-iron; not nonstick) with foil, then heat over moderately high heat until hot. Add half the tomatillos, cut side down, half the garlic and the jalapeno. Cover with another piece of foil and roast on stovetop until browning, 4 to 5 minutes (and don’t be alarmed if the skillet smokes a bit). Turn vegetables, re-cover, and roast another 3-4 minutes, until tomatillos are soft. Repeat with remaining tomatillos and garlic, then transfer all to a food processor.

Turn heat to medium-high, and when skillet is hot, toast the pine nuts, shaking them to keep them from burning. When they begin to brown, remove from heat and add to the food processor.

Add cilantro, parsley and sea salt, and one cup of the broth. Puree until all ingredients are smooth. If the sauce is thick, add another ½ cup of broth.

Heat a large skillet over high heat, then add the olive oil. When it’s hot, add the tomatillo salsa. Reduce heat to medium and simmer for ½ hour, stirring often. If it gets too thick, add water, ¼ cup at a time. You want the salsa to thicken, but not so much that it lacks moisture and/or spatters. Adjust salt and pepper as necessary.

Soba Noodle Stir-fry with Soybeans

February 1st, 2008

soba_stirfry.jpg

(Vegetarian, Vegan, Gluten-free)

Last night, 7 inches of snow tumbled through the sky and landed on our city, smoothing out the sharp edges and muffling all but the most insistent of sounds. Today was a snow day for both Simon and me, and we spent a chunk of it sledding down Art Hill. So today I thought I’d post a recipe in celebration of Spring.

Now don’t get me wrong, I love the snow. Snow makes me happy in a way that little else does. As I watched it fall through the night, sometimes in flakes that were big, fat and furious, other times in meandering sprinkles that looked like they’d never find their way to the ground, I felt both invigorated and soothed. For a few precious hours early this morning, the city was silent. No car moved down our street, and the only tracks in the snow belonged to birds, squirrels, and one brave runner.

Snow makes the world seem safe and small.

But it’s almost Setsubun, or Japanese Bean Day. What kind of a bean blogger would I be if I let a bean holiday slip by unannounced?

Setsubun literally translates to “season division”, and though it is the name given to the day before the beginning of each season, it is most widely celebrated on February 3, to celebrate the arrival of Spring. A Japanese holiday calls for a Japanese dish, and I’d been looking for a reason to cook with seaweed.

The Recipe

I have to admit, I had real doubts when this dish was coming together. It made the house smell bad. The combination of hijiki (a brown sea vegetable that grows wild on rocky coastlines in Asia), frying cabbage, and musky shitakes gave off an aroma that was both pungent and, well, cave-like. But I figured with ingredients like onions, bell peppers, and carrots it was hard to go wrong. In the end, I’d say that this dish is not quite balanced, in that the nose doesn’t match up with the palate. I still wasn’t thrilled with the way it smelled, but the flavor profile was fantastic.

Although there are a lot of Japanese beans to choose from, for this recipe I went with Envy soybeans. I’m particularly proud of these beans, because they grew in our garden last year. They were meant to be eaten fresh, as edamame, but last summer was a busy time for us and before I knew it, my beans were drying on the vine. Well enough, because they made a great addition to my soba noodle salad.

I don’t know much about the history of this heirloom soybean, except that it was cultivated by the late Professor Edwin Meader, and since it’s an early producer (80 days) it’s suitable for Northern climates too. I bought my seed from Seed Savers Exchange, but it’s also available through Baker Creek Heirloom Seeds.

Soba Noodle Stir-fry with Soybean

8 ounces uncooked Soba noodles (Japanese buckwheat pasta)
¼ cup hijiki
4 tablespoons sesame seeds
3 tablespoons peanut oil
3 cups shitake mushrooms, sliced
1 red bell pepper
1 jalapeno, seeded (optional)
3 cloves garlic, minced
1 small yellow onion
2 carrots, julienned
2 cups soybeans, cooked
2 cups green cabbage, shredded
2 cups red cabbage, shredded
3 tablespoons (plus more as needed) soy sauce
2 tablespoons rice wine vinegar
¼ cup fresh cilantro, chopped
1 tablespoon dark sesame oil

Cover the hijiki with water and let soak for 30 minutes. Drain, then place in a saucepan with 2 tablespoons soy sauce and enough water to cover it. Bring to a boil, then reduce heat and simmer for 15 minutes. Drain, reserving the liquid, and set both aside.

Meanwhile, cook the soba noodles in a pot of boiling water until they are al dente, about 6 minutes. Drain, rinse well with cold water, and set aside.

For this part you’ll need a wok or a large non-stick skillet. I prefer to use the skillet, because in my experience, the long sides of a wok don’t get hot enough to fully cook all the ingredients. A skillet for this recipe will have to be able to hold what a wok could.

Place sesame seeds in heated wok/skillet and cook until they are toasted and fragrant, about 3-4 minutes. You’ll need to shake them now and then so they don’t burn. Remove when toasted and set aside.

Heat the peanut oil until very hot, and then add garlic and onion. Stir-fry for 2 minutes. Add the carrots, shitakes, jalapeno and bell pepper and cook for 2-3 minutes. Add soybeans and both types of cabbage and cook for 2 minutes more, adding a small amount of oil if necessary. Ingredients should be lightly coated with oil. Add the remaining soy sauce and the rice wine vinegar and cook for 2 minutes. Add the hijiki, saving enough for garnish, the reserved hijiki cooking liquid, and the soba noodles and mix well with the vegetables. Cook 1 or 2 minutes more, until heated through.

Add the toasted sesame seeds, the cilantro and the sesame oil. Transfer to a serving platter and garnish with hijiki and cilantro, and serve.

Winter Celebration Salad

January 24th, 2008

jicamasalad.jpg


(Vegetarian, Vegan, Gluten-free)

On the Myers-Briggs personality test, I come out as an INF P/J. That is, introverted (but I prefer to call it internally-focused), intuitive, and feeling, with an almost even split on perceiving/judging. If you consider the first three typologies – self-navigated, intuitive/interpretive (and dare I say creative?), and emotionally flowing – well, just try to picture me cooking by the book.

It’s challenging enough for me to remember to measure and document how much of what I’m putting into each recipe I post. I could size up a serving and estimate – pretty accurately, too – the nutritional content of just about anything on a plate. But if you ask me to prove it – and show my work – well, we’ve got trouble.

As I do with every recipe for this site, for the Winter Celebration salad I painstakingly measured, weighed, sifted, leveled, fluffed and separated as appropriate, and wrote it all down in exacting increments. Imagine my distress when after all that, I lost it. The piece of paper that I’d been scribbling on went out with the recycling.

This blogging stuff is hard work!

As it turns out, I was happy to make and eat this dish again, and since it’s a salad it’s hard to get the proportions too wrong. The main challenge was the dressing. So I got to be intuitive here and you still get a recipe – it’s win win. And if the original recipe finally shows up, I’ll correct for any egregious mis-directions.

This salad is a true celebration of winter’s fruits. Mostly I made it because it was visually stunning, and I was thrilled when it tasted beautiful too. I’m crazy for blood oranges, which are too briefly in season. I can’t get enough of their vibrant purple-red flesh and their slightly berried flavor, so I knew I had to use them in a recipe while they were around. In this salad I’ve combined them with avocado, red onion, jicama (pronounced heek-uh-ma, also known as the Mexican potato), and mango (technically not a winter fruit, I know). This week’s heirloom bean is not a bean proper, but it is a legume — the French Green Lentil.

Blood Oranges

Like beans, lentils are their own branch of the legume family (Lens culinaris). They’ve been around since the Bronze Age, and almost all of them have the traditional earthy flavor and the appearance of a closed eye (hence the Lens in the Latin name, maybe? I’ll have to look that up). French Green lentils are an heirloom that I got from Victory Seeds. Technically they sell them for planting, but they sell a 3-ounce pack, and that’s plenty for a salad.

Described by Victory Seeds as a “very rare heirloom”, French Green lentils are a mottled olive color, with yellowish and almost black splotches. They have the traditional earthy lentil flavor, but the finish is almost peppery.

The Recipe:

Winter Celebration Salad

Ingredients
3 blood oranges, peeled and cut into pieces
1 jicama, peeled and diced
1 avocado, sliced
1 small red onion, diced
1 mango, cubed
2 cups cooked French Green Lentils (this is a lot of lentils for a salad but I didn’t want to waste any of them – you might want to use less)
¼ cup fresh cilantro, chopped, plus sprigs for garnish
¼ cup fresh parsley, chopped, plus garnish

Dressing:
Juice of one orange
Juice of 1 lime
4 tablespoons extra virgin olive oil
1 tablespoon white wine vinegar
1 teaspoon chipotle pepper, in adobo sauce (or you can use dried)
Salt and pepper to taste

The beauty of this dish is that there’s not a bit of cooking. Just chop ingredients and combine. Mix the dressing ingredients in a bottle or jar and shake well, and add to salad (but since I winged it on this dressing, you better use your eyes as a judge to determine how much is enough. You don’t want to saturate the salad). Toss salad to lightly coat everything.

This salad is vibrant – the crisp-pearlike jicama, the fruity mango, the acidic but sweet oranges. The creaminess and the (monounsaturated) fat content of the avocado emulsifies and smoothes the flavors, and mellows the (very, very slight) heat that the chipotle lends the dressing. Enjoy!

Hutterite Bean Soup

January 18th, 2008

hutteritebeansoup.jpg

(Vegetarian, vegan/gluten-free option)

So this is embarrassing: when I was a kid, I used to play like I was a Hutterite. The embarrassing part (aside from you now envisioning me in make-believe games) is that I didn’t really know what a Hutterite was, and still don’t, entirely. It wasn’t their pacifist ideals or their community living, or even their great soup beans, that appealed to me. No, I was pretending to be a Hutterite because I liked the sound of the word.

All those harsh consonants and assertive vowels. A fast word, almost an imprecation. Something hurled at the car engine when your tinkering failed to make it ignite. The word opened all sorts of possibilities to my imagination.

I was a nerdy, wordy kid. Even my dress up games were word games.

I did look it up in an encyclopedia. There I was, 8 or 9 years old, and struck almost wordless (almost) by the fact that the Hutterites didn’t allow their members to wear aggressive uniforms – no cops, no military. The notion seemed mystical to me, more than anything. Being a Catholic school girl, I couldn’t imagine the absence of uniform. I liked it.

So it was with a strange sense of wonder that I responded to the discovery of the Hutterite Soup Bean, sitting pale and pretty on page 9 of the Seed Saver’s Exchange catalog. You can imagine my thrill when I discovered that they also sold them as eating beans.

I think that at the end of this year, these little beans will be very close to the top of my list. Unremarkable in appearance (unlike the Hutterite people, who often wear vibrant colors, unusual for a religious sect), the Hutterite Soup Bean is delicate and creamy, almost buttery. It’s no wonder then that when the Hutterites fled persecution in Eastern Europe and headed for North America, they packed the bean and brought it too.

hutterite-bean.jpg

The Soup Bean seems to have more natural oils than most beans, and so even though it’s dense it also melts in your mouth. In this recipe, I made a half-hearted attempt to mash some of the beans, and they were very agreeable (pacifists too, I guess). It strikes me that this would be a good chowder or hummus bean.

The Hutterite Soup Bean has made it onto the SlowFoods Ark of Taste. Seed Saver’s Exchange notes in their catalog that it’s on the “more endangered” section of the Ark, so if you’re looking for a dry bean to grow this season, this might be a good one. Also, I’ve read that it’s hardy, fast-growing and productive in the garden. And saving beans for genetic purity is relatively easy (but more on that as we get closer to gardening season).

The Recipe:

Like a lot of my soups and stews will, this one looks complicated. I promise, it’s not. It has fewer steps than the seafood chili because essentially you just dump it all in a pot, but it does have a daunting number of ingredients. It’s partly because I’m cooking without meat and have to build the complexity of flavor another way. It’s also because, as I explained in my first recipe, I layer my flavors, going for base notes, middle tones and a high finish. When you lift the lid during cooking, this soup gives off a rich, caramel aroma.

The ingredients are negotiable. Everything is in cooking. I really want to encourage you to trust your senses, to feel your way through food preparation, and to be open to the unexpected. That said, if you follow this recipe you’ll get a happy result.

So here we go:

Hutterite White Bean Soup

Ingredients:
Parmesan rind (not essential, but start saving those now because they are great for soup, and if you already save them then you know what I’m talking about).

1 tablespoon olive oil
1 large white or yellow onion, diced
5 cloves garlic, crushed
3 stalks celery, diced
1 small jalapeno, seeds removed
3 carrots, diced
2 potatoes, cut into small cubes (you can leave skin on – up to you)
6 cups vegetable stock
¼ cup chili sauce
½ cup fresh cilantro
½ cup fresh parsley
2 1/2 cups pre-cooked Hutterite Soup Beans

Seasoning:
2 bay leaves
1 teaspoon thyme
2 tablespoons cumin
1 teaspoon coriander
½ – 1 teaspoon dried jalapeno
2 teaspoons oregano
1 teaspoon paprika
Salt and pepper

Garnish:
Asiago shavings (or other hard sharp cheese)
Asiago croutons (recipe below)

In a skillet, heat olive oil on medium until it’s hot and then sauté the garlic and onion until it’s translucent, about 3 minutes. Add the jalapeno, carrots and celery, and cook another minute or two. Even though the veggies will soften as the soup cooks, I’ve learned from experience that sautéing them first helps them retain their texture.

Add the vegetable stock and the potatoes. If you have a rind from a hard cheese, add this to the water too. Add the dry seasonings (bay leaf, thyme, cumin, oregano, coriander, paprika and dried jalapeno), plus salt and pepper to taste. Add chili sauce and the beans, bring to a boil and then reduce heat and simmer for 30 minutes.

When the soup is getting near done, scoop up some of the beans with the back of a wooden spoon and gently mash them against the side of the pot. This will thicken the soup and vary the texture. Stir them back in, then taste the soup and adjust seasonings to your preference. Remove the bay leaves and the cheese rind and discard both. Add the fresh parsley and cilantro, and cook for another 5 minutes.

Before serving, garnish with Parmesan or asiago shavings and croutons.

Asiago Croutons
If you can’t buy them, they’re easy to make. Cut a loaf of asiago cheese bread into small pieces (or for a rustic look, tear them). Heat oven to 375, place bread cubes on baking tray, and let bake for 10-15 minutes, turning once and checking constantly. When they have begun to turn golden, remove them.