The Best Utensil

January 14th, 2008

The New Year’s Resolution Roast

veggiecasserole.jpg

(Vegetarian, vegan, gluten-free)

It’s possible that my sister-in-law won’t eat my cooking again. During the holiday season several of the women in my family gathered in my kitchen for a cookie-making marathon. And indeed it was; we whipped up chocolate mousse bites, Russian wedding cakes, cinnamon chip, ginger biscotti, peanut butter bars, and yes, cornflake wreaths (my sister’s specialty).

At one point during the clattering of pans, the roar of mixers and the raucous laughter, I realized that my sister-in-law was staring at me, aghast. I followed Heather’s gaze, which was settled upon my hands. Except that you couldn’t actually see my hands, submerged as they were in a dense, allspice-scented batter. I was working the hazelnuts into the dough. I gave Heather an inquisitive look, and she shrugged and turned back to her own wooden-spoon combined pastry. Later, I grabbed a handful of cake flour from the canister, unwittingly letting some fall through my fingers as I went to sprinkle it into my wet dough. Again, Heather caught me. This time I shrugged.

That’s how I operate in the kitchen. Intuitively, assertively, almost impulsively, smelling my way through things, using my eyes as a scale, my ears as an assessment of doneness. And unfailingly and unapologetically, using my hands as kitchen utensils. I’ve been noticing lately that this startles people. But why? My hands work better than any kitchen tool, and they’re always, well, on hand, and if I’m cooking then I’ve washed them first and I’m touching the food regardless so… what’s the big deal? And anyway, I’ve seen Jamie Oliver do it, so maybe I should just adopt some British-isms and then it will all be pukka.

Here’s a recipe that will give the fingers a workout. It isn’t a bean recipe. Heck, it’s barely a recipe at all. Now and then I’ll toss some non-legume foods into the mix, because the Year of the Bean Alone would be one long year. What this dish really is is my New Year’s resolution on a plate.

Simon and I are guilty of letting beautiful produce go to waste (and since I do 3/4ths of the cooking, that really means me). It’s not that we don’t eat it. It is, rather, that at markets and grocery stores I get kind of giddy when I see all those shiny peppers and happy tomatoes and multi-colored Swiss Chard stems. Though we entertain a lot, day to day it’s just Simon and me, and we end up composting an embarrassing amount of food (although, oddly, the cats love Brussels sprouts and edamame, so those never go to waste).

It’s no consolation to me to know that I’m not alone. Here’s a fact that left me bloody gobsmacked: According to a 2002 University of Arizona study, the average family throws away 470 pounds of food every year. That’s 14% of food brought into the home, worth roughly $650. There are actually a number of new food-storage technologies on the market to help slow food decay (if you’re interested in what I found, see the end of this post), but I’ve vowed that this year I’ll eat them while they’re fresh.

StirringVeggies

The Recipe:

Twelve days into the year and I was staring at a drawer full of veggies on the edge. Here’s a recipe for when you find yourself in the same straits.

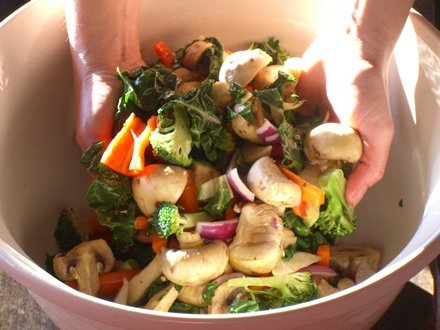
1. Wash your hands. I mean scrub them. People are going to eat this stuff, after all.

2. Preheat your oven to 400.

3. Gather up all the veggies that are looking short for this world. Wash and then peel/core/chop them, and scrape them into a big bowl.

4. Gleefully using your very own fingers, toss the veggies.

5. In another bowl, combine enough olive oil to coat your veggies, some chopped garlic, a squeeze or two of spicy mustard if that appeals to you, salt, pepper, and a generous dash of vinegar. Also throw in whatever herbs smell good in the moment. For this batch, I used oregano, thyme, Fines herbs and a dash of tarragon. Mix well (use a spoon or a small whisk for this part — I did!) and then pour it over your veggies.

6. Get your hands ready. You’ll need them to toss the veggies again, making sure they’re coated with the oil/vinegar mixture.

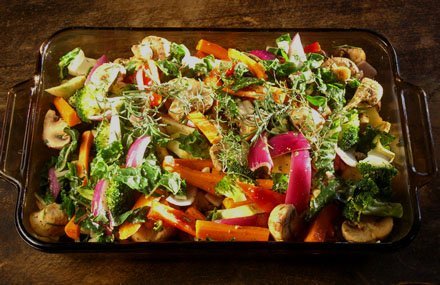
7. Dump them into a baking dish.

8. If you are lucky enough to have fresh herbs growing inside, snip a sprig or two and throw it on top. I have rosemary and thyme, so that’s what I used.

9. Stick it in the oven and let it roast till veggies are tender but not mushy. The length of time will depend on what kind of veggies you used and how big you chopped them.

10. Using your hands (but wearing an oven mitt!), remove veggies from the oven while they’re sizzling, steaming and letting off a pungent aroma. Lovely jubbly!

Still, if you just can’t eat them fast enough, there are some new gadgets out there to help. I’ll probably mention this again at Easter, because it’s a perfect gift. It was around Easter last year that I discovered the E.G.G, or the Ethylene Gas Guardian. About the size and shape of an egg, and available in pastel shades like pink and yellow, these little guys get dropped into the crisper drawer and absorb up to 97 % of the ethylene, the gas that’s primarily responsible for produce decay. Other products that absorb ethylene are the ExtraLife disk and BioFresh produce bags. In my experience, the E.G.G.s work best though.

And of course if you do let fruits and veggies go bad, compost them!

Brown Tepary Beans

January 11th, 2008

Tepary Bean Whipped Hummus

TeparyHummus

(Vegetarian, vegan, gluten-free)

I think my second recipe should be simpler. I got a pointed request for a “chili with fewer steps, please,” so I’ll be getting to that before the cold season ends. But for today, I’m looking at a (really easy!) sort of hummus, made from one of my absolute favorite beans: tepary beans. It might be fair to say I’m in love with tepary beans. I was reluctant to use them so early in the year because I didn’t want to use them up, but happily there are multiple kinds of teparies. Native Seeds/SEARCH offers 28 different varieties of seeds; at the moment they’re only selling two teparies for eating (their offerings vary from season to season and year to year), but that’s okay because I keep things. And dry beans are made to be kept. From years past I still have a stash of teparies: white, blue speckled, and Paiute mixed. For my hummus, I’m using brown tepary beans.

First, a word on hummus. Technically it’s not, unless it’s made with garbanzos. I just wanted to preempt an uproar from the semantic diehards among you.

And some words on teparies. Though they’re little heard of outside the American Southwest, and not so much within that area anymore, they were a staple for the Native Americans living in that part of the world. They were first cultivated by the Hohokam Indians in Arizona – from 300-1200 a.d. These little beans have quite a bit of history under their pods, and it makes them even more remarkable for being around today, in our culture of processed food. Teparies are particularly suited to the American desert, because they love heat, drought, alkaline soils and relentless sun, and they mature relatively quickly – in about 85 days.

Teparies have been featured in the research that Native Seeds/SEARCH is doing on the effects of a traditional diet on Type II diabetes in Native American populations. I go into this a bit on the Where to Buy Beans page, but essentially NS/S has observed that the surge of Type II diabetes in that population directly corresponds to the rise of processed foods. The theory is that the Native American body evolved alongside the traditional Native American plants, and so their bodies have been shaped around these foods. Certainly, European Americans aren’t faring well on a diet of fast food either, but it is true that we may be more acclimated to heavier foods because we evolved in a colder climate. Very interesting stuff, and I’ll talk about it off and on as I move through this year.

One more fascinating thing about teparies. Recent studies conducted in the US and in Mexico indicate that lectin and other compounds in tepary beans may be a useful treatment for halting the growth of cancer. I don’t quite get this, because my understanding of lectin in plants is that it encourages them to grow, and concentrations of lectin thin out as the plant evolves from bean into mulit-leaved green thing. I’ll check with Simon, the science (and computer) wiz in our household, and see what he knows about that.

The recipe: Teparies are very dense beans. What’s more, they maintain their texture and density even when well-cooked, so at first it might seem counterintuitive to use them in a hummus recipe. I love their rich, nutty flavor though, and the fact that they are higher in protein and fiber, and lower in fat than other dry beans (which accounts for their density). To lighten things up, then, I added a cooked potato and whipped it up in the food processor along with the beans. It occurs to me that a sweet potato might work too, and would not dilute the brown color of the beans. It would also add beta-carotene. Next time I’ll try that and see how it goes. If one of you tries it first, please let me know.

As far as the garlic, I know what you’re thinking. “Holy (your word pick goes here), she’s putting 6 garlic cloves in with a few cups of beans? Between the breath and the intestinal distress, no one will want to be my friend…” Trust me here. I’m going to tell you something about garlic: the longer you cook it, the milder and softer the flavor (and the smell) becomes. Honest. If you sauté the garlic until it’s ghostly pale, the pungent bite will segue into a smooth, layered flavor that will give a lift to the teparies. Of course, there is some debate about whether cooked garlic packs the antioxidant and antibiotic punch that raw garlic does, but much of the consensus seems to be that if you crush the garlic and let it sit for a few minutes before cooking, it will retain most of its health benefits.

What else? For the olive oil, you want to use the best stuff you have. The oil isn’t cooked and so its sharp, citrus flavors will really shine through. I served this on crackers, but it’s lovely on crostini, or even as a sandwich spread. If you can’t come by teparies, go ahead and experiment with a bean other than the chickpea. And let me know what you find.

Tepary Bean Whipped Hummus Recipe

1.5 cups dry brown tepary beans
1 medium yellow potato
6 cloves garlic
Juice of 1 large lemon
3 tablespoons tahini (sesame butter)
1 tablespoon plus 1/3 cup extra virgin olive oil, plus oil for drizzling
½ cup fresh parsley
Water – added at ¼ cup at a time
Salt and pepper to taste — you’ll have taste and adjust to your liking

Soak the tepary beans in water. You can either soak them overnight or you can cover them in water, bring them to a boil, turn off the heat and let them sit for one hour. Then cook tepary beans until soft, about 1 ½ hours (teparies take awhile – that density again). Beans expand about 2.5 times when they are cooked, so use enough water – if you have too much you can always pour it off later, but you can’t unburn the beans! Cut the potato into large slices – you can leave the skin on — and add it to the water at the end of the cooking. Cook it until it’s soft, about 10 minutes.

Saute the minced garlic in 1 tablespoon of the olive oil until it’s see-through but not crispy. Place all ingredients except the water in a food processor. Puree until well mixed, and assess the dryness of your hummus. If necessary (and it likely will be) add ¼ cup of water and blend again. Continue to add water until you have a smooth, creamy consistency. Adjust salt and pepper, then serve. I like to garnish it with garlic stuffed green olives, but you can get creative here — parsley, capers, fresh carrots, tomato slices… Before serving, drizzle olive oil over hummus-topped crackers.

Note: the tepary beans came from Native Seeds/SEARCH. Next recipe we’ll be featuring Lina Sisco Bird Egg beans, from Seed Saver’s Exchange.

Moon Beans

January 5th, 2008

Winter Seafood Chili with Pumpkin

MoonBeanChili

(Pescetarian, Gluten-free)

I’ll warn you straight away – my recipes are not for folks with timid palates. Over the years, my recipes have gotten hotter and hotter. It’s not because I take perverse delight in hearing the name of the lord rise from the mouths of unsuspecting people (well, maybe a little), but rather because my own tolerance for heat keeps inching upward.

And, okay, I exaggerate. It’s not as bad as all that. Plus, when I post a spicy recipe, I promise that I’ll tone it down so it provides just a bit of warmth, and I’ll hope that you’ll season it to taste if you’d like more heat. Also, let me clarify: I’m not aiming for heat for its own sake . A finely layered, complex set of spices wakes the mouth like a good wine. First you get the flavors on the sides of your tongue, then a sharp bite at the back, followed by a lingering warmth, a nice soft glow. I layer different chiles and peppers for a complexity that you just can’t get with a simpler concoction. Fresh peppers lend an earthy, grassy tone, but when they dry they become fruitier and the heat is balanced by the sweetness, so I use a combination of both.

In this chili I’m going for a structured spice profile, with a big mouthfeel and a long finish. Garlic, onion and cumin form the base notes, and you’ll smell those before you taste them. Then follows the tang and zip of black pepper, coriander, cinnamon (my favorite secret ingredient in lots of things – you’ll see) and a rich smoky taste. You’ll be left with a slow rising, sweetness-tempered heat.

In this chili, I’ve chosen two beans, one for the texture and one for the flavor and visual effect. The Moon beans (Phaseolus Lunatus. Beautiful, no?) are heirlooms that are native to the American Southwest. High in fiber and protein (as most beans are), these gorgeous little pebbles keep their markings when they’re cooked (we’ll see them again in a salad as the weather warms). Moon beans have a rich and fruity flavor, which makes them perfect for this chili. I also used a red bean, maybe heirloom, maybe not, bought in bulk at my natural foods store. This red bean is added for the color – I whirl some up in the food processor to thicken the stew – and their traditional taste. Enough about all this, and onto the recipe. But one last thing. Salt is an important flavor emulsifier, but when you’re cooking dry beans you want to add it last. I don’t know why (I’ll look it up and get back to you) but holding off on salt until the end makes beans less…. digestively disruptive.

Wine Pairing: Because this is hot and spicy, it will pair well with a semi-sweet white wine or a Riesling. However, I’d encourage you to try it with a big red. The chili is bold enough so that the flavors harmonize rather than locking horns My favorite friend to cook with, Jill, and I made this chili for a dinner party not long ago, for a group of friends who love wine as much as food. We hooked this dish up with big red Zin, and it was superb. We tried Dickson’s Mill Zinfandel (Sonoma County) and Handley Zinfandel (Redwood Valley).

Winter Seafood Chili with Pumpkin

3 tablespoons extra virgin olive oil
1 white or yellow onion, diced
1 red bell pepper, diced
1 orange bell pepper, diced
2 medium jalapeno peppers, seeded (or not, if you want more heat) and diced
8 garlic cloves, minced
1/3 cup dark chili powder
2 cups canned tomatoes and their juice, diced
4 tablespoons cumin
1 tablespoon smoked paprika
2 teaspoons dried ancho pepper
1 teaspoon Aleppo pepper (see my favorite things)
2 teaspoons sweet paprika
1 sprinkle coriander
1 pinch cinnamon
6 cups broth (I use vegetarian un-chicken broth)
1 14-ounce can tomato sauce
1 generous dash of liquid smoke
1 healthy dash of hot sauce
4 cups pumpkin, peeled and cubed (if you can’t get pumpkin, use any winter squash, but pumpkin makes it special)
3 teaspoons salt
Black pepper
12 ounces haddock, cut into bite-size pieces
1 pound medium shrimp, peeled and deveined
2 cups Moon beans
2 cups red beans (reserve ½ cup for liquefying)
juice from one lime

In large stock pot, heat the olive oil and sauté the onion, bell peppers, garlic, and jalapeño peppers on medium heat, until the garlic and onion are translucent (about 5 minutes). Add all the dry seasonings and tomatoes and continue sautéing till tomatoes are warm. Add the chicken stock, liquid smoke, hot sauce, pumpkin, salt and pepper. Place reserved beans in a blender or food processor, add a bit of water or broth, and puree. Add this to the pot. Bring to a boil and then reduce to a simmer for 15 minutes. Stir in the haddock, shrimp and beans. Cook for about 10 more minutes, until the seafood is opaque and the squash is tender. Remove from heat. Stir in lime juice and serve.

Chili is one of those dishes that is better the second day, so if you’re so inspired to make it ahead of time and let the flavors mingle, withhold the seafood until the day you plan to serve it.

Note: The Moon beans came from Native Seeds/SEARCH (see Where to Buy Heirloom Beans)